Why should you Test an LED Driver?
The importance lies in its functionality. An ineffective driver can reduce an LED’s lifespan or prevent it from working altogether. Hence, regularly testing an LED driver ensures you get the best out of your LEDs. The tool of choice for this purpose? The indispensable multimeter.
Find out what type of LED driver you need with our LED Driver Calculator
Basics of a Multimeter
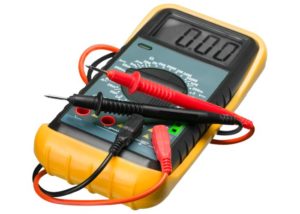
A multimeter is an electronic measuring instrument that combines multiple measurement functions in one unit. Here’s a breakdown:
Components: A typical multimeter consists of a rotary switch to select the function, a digital or analogue display, and two probes.
Settings: It can measure:
- Voltage (DC & AC): Electrical potential difference between two points.
- Current: Flow of electric charge.
- Resistance: How much a substance opposes the flow of electrical current.
- Safety Tips: Always turn off the power supply you’re testing, never touch exposed wires, and always start with the highest setting then dial down.
Testing for Continuity in your LED Driver
Continuity is foundational to the functioning of any electrical system, representing an unbroken path through which electricity can traverse. To determine continuity in your LED driver, your multimeter becomes an indispensable tool.
Start by adjusting its settings: look for the continuity setting on your multimeter, typically represented by a sound wave or diode symbol. Once set, proceed to probe the LED driver’s terminals with the multimeter’s probes, ensuring consistent and firm contact.
As you touch the terminals, listen closely. The multimeter will usually emit a beep if there’s continuity, signifying a closed circuit. Conversely, the absence of this beep typically highlights an open circuit, pointing to potential issues in the LED driver that might necessitate closer inspection or repair.
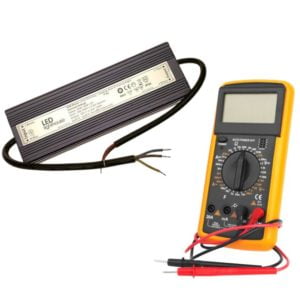
Measuring the Output Voltage of your LED Driver
Regardless of the type of LED driver you possess, be it a ’12v LED driver’ or its ‘24v LED Driver’ counterpart, accurately measuring the output voltage is imperative to confirm its operational efficacy within the designated specifications.
To initiate this assessment, first, configure your multimeter: position it to the DC voltage setting, ensuring it’s ready to gauge the precise electrical potential of the driver. Then, with a steady hand, position the probes directly onto the driver’s output terminals, ensuring optimal contact for a reliable reading.
Once you’ve gathered a measurement, it’s pivotal to contrast this figure against the anticipated voltage, like 12V or 24V, as highlighted on the driver’s label. Any stark discrepancies between these figures may underscore underlying issues or inefficiencies, warranting a more thorough examination or potential interventions.
Measuring the Output Current of your LED Driver
An overly surged current can be the nemesis of an LED’s lifespan and performance. To preemptively counteract any damage, the multimeter once again becomes our diagnostic ally.
First, set your multimeter to measure the current. Instead of just touching the LED with the probes, connect the multimeter so the power flows through it. This lets you see how much power is actually going through. If the number you get on your ‘dimmable led driver’ or ’12v dimmable led driver’ is different from what it should be, there might be a problem. This could mean your driver is faulty and might need a closer look or even a replacement.
Testing Input Voltage
When it comes to testing the input voltage of your LED driver, especially critical ones like ’24v dimmable led drivers’, precision is key.
Begin by preparing your multimeter: if your LED driver uses an AC input, ensure the multimeter is adjusted to the AC voltage setting. With that done, it’s time to get hands-on. Use the multimeter probes to make contact with the driver’s input terminals, making sure you have a good connection. As you obtain a reading, it’s essential to contrast this with the expected input value.
Any discrepancy between your reading and the expected value could indicate a potential issue that might affect the overall performance of the driver. Addressing this early can save time and ensure your LED setup runs smoothly.
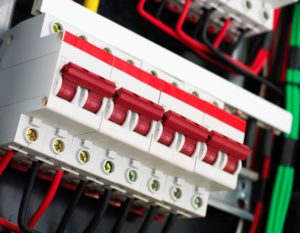
Checking for Short Circuits or Open Circuits
Understanding the intricacies of short and open circuits is vital for the health of your LED driver. A short circuit happens when electricity discovers an unintended shortcut, bypassing the regular path, while an open circuit signifies a break in the electric route. Both scenarios can cripple an LED driver’s efficiency.
To identify these issues, a multimeter is invaluable. For open circuits, a continuity test is your go-to; the absence of the usual beep can flag a potential break in the circuit. On the other hand, short circuits can often be deduced from signs of unusually high currents or abnormally low resistance readings on your multimeter. Should you spot any of these irregularities, it’s wise to tread with caution.
While some minor issues might be fixable with a keen eye and steady hand, many circuit-related problems, given their complexity, call for professional intervention. Often, it might be more economical and safer to consider professional repairs or even replacements to ensure the longevity and safety of your LED setup.
Troubleshooting Tips
Even the most robust LED drivers can experience issues. Thankfully, with a trusty multimeter at your side, many problems can be diagnosed. Here are common issues and how to pinpoint them:
1.) LED Not Lighting Up
Utilising the continuity setting on your multimeter is a practical approach to identifying any breaks or interruptions in the circuit. If the multimeter points out a break, the root of the problem might be traced back to issues with the wiring or an inherent defect within the LED driver itself.
In such situations, thoroughly inspecting all connections is a prudent first step. If the problem persists, replacing the suspect components or seeking expert advice can often resolve the issue, ensuring your LED setup functions seamlessly.
2.) Flickering or Inconsistent Lighting
If you notice flickering or inconsistent lighting in your LED setup, promptly diagnosing the root cause is essential. Start by measuring the output voltage using a multimeter. Should you observe notable fluctuations in this reading, it’s an indication that the LED driver may not be providing a steady power supply.
The immediate fix would be to double-check that the power source feeding the driver is stable and devoid of any inconsistencies. However, if the lighting irregularities persist even after this check, it might be time to contemplate replacing the LED driver to ensure a consistent and reliable lighting experience.
Having problems with your Dimmable LED Strip Lights? Check out our LED Strips Troubleshooting Guide
3.) Overheating Power Supply
When encountering potential overheating issues with your LED or its driver, it’s prudent to turn to a multimeter for accurate diagnosis. By measuring the output current, you can identify if an excessively high current is the culprit behind the overheating.
The optimal solution is to cross-reference and ensure that the driver is in sync with the LED’s specifications and needs. If you find that both are correctly matched yet the overheating persists, this might signal that the driver itself is defective. In such scenarios, considering a replacement becomes a wise course of action to prevent further complications.
4.) Short Lifespan of LED Strips
Identifying the cause of premature LED burnout often involves a detailed examination of the underlying components. By using a multimeter to measure both the output voltage and current, you can pinpoint discrepancies. If you find that either the voltage or the current is surpassing its intended specification, it’s a likely contributor to the early burnout of the LED.
The best course of action here is to ensure that your LED driver, whether it’s a ‘dimmable led driver’ or a ‘24v led driver‘, aligns perfectly with the specifications of your LED. This harmonious match will not only optimize performance but also extend the longevity of your LED setup.
Summary
Understanding and maintaining your LED driver ensures the longevity and efficiency of your LEDs. With the help of a multimeter, you can easily ‘test a led driver’. Whether you need a standard ‘12v led driver‘, a ‘24v dimmable led driver‘, or any variant, regular testing is pivotal.
LED technology is evolving. Stay updated, and make sure your drivers are in top shape. Looking for quality LED drivers? Head over to our product pages to place your order today!
Why don’t you check out our Festoon Light range they are a perfect addition to any garden, we have multiple blogs to help you Hange your Festoon Lights, Ideas for where to hang them in your garden and if you’re still not totally sold we have a Pros and Cons list for Festoon Lights.
Note: Regular maintenance and testing can save costs in the long run. Always ensure safety while handling electrical equipment. If unsure, consult a professional.